The Four Solutions to Solve the Problem
const imgDrinkomat = const imgCDNmap = './cdn_map.png' const imgCloudfrontLifecycleSteps = './cloudfront_lifecycle_steps.png' const imgCloudfrontLifecycle = './cloudfront_lifecycle.png'
These days technology is changing rapidly. New requirements, tools and techniques are coming up almost daily. The resulting varity of tools can make it difficult to find the appropriate solution to a given problem.
In this post, I will share a story about what took us four iterations to find the right solution to a problem we faced. I will give you a quick run-through to all our attempts and share our final solution at the end. Let’s start with the problem first.
The problem: White logos on a white background
We work with a third-party provider to detect brand logos in pictures. This provider returns an image URL for each logo found in a picture. In our web application, we list all the logos next to the original picture. The majority of these logos are either white or black but in the colors of the respective brand. Our application is using a white background so displaying white logos directly on it doesn’t quite work.

The returned logos are transparent PNGs so we could adjust the background color to grey. Still,to support a large variety of logos we need to come up with a solution that works with all logos.
The idea: Tint the background
White on white doesn't work so well. So what if we determine whether a logo mostly consists of white pixels and tint the logo background black in that case.
Sounds simple right? So how do we get there? How would you implement this, and more importantly, where? On the server, on the client or somewhere in between? This is where our journey to solve the problem starts.
Solution I: Client-side
At first we looked at the browser. Large parts of our web application are client-side code so it was tempting to start there.
We used the canvas API to read through the logo pixel by pixel to figure out if it’s rather white or not. If it’s withish, we added a CSS class to the surrounding <div>-element which tints the logo background black.
This solution was just a couple lines of code and deployed to production on the same day, but it had some caveats.
Pros
- Straight-forward to develop and ship as part of our existing web application
- Immediate value for our customers
Cons
- Requires a certain HTML markup
<div><img /></div>. - It doesn’t work if the logo is embedded as a CSS background image.
- The developer needs to be aware of this helper function and use it.
- Without additional caching logic, the same logo gets processed many times
- Delegates additional compute to the client (can be seen as a pro argument as well).
After a couple of weeks, we noticed that this approach was not applied in all places where we showed logos. Further, at least in some areas, this approach wasn’t straightforward to implement because a certain HTML markup is needed. There has to be a better way!
Solution II: Server-side
Our web application is partly server-side rendered. Why not make use of the server and run the image manipulation there?
We added a proxy that was capable of loading and applying the black background if necessary. For security reasons, we restricted the uri parameter to the third-party provider host. A request made from the client looked like this: https://company.com/logo-proxy?img=https://third-party-logo-api.com/brand-name.png.
Finally, we stored all processed logos in-memory to reduce the load on the server. We did some tests and even with 1000+ logos the memory consumption didn’t increase much.
However, there are two major issues with this solution:
- A redeploy wipes the memory cache, and we deploy many times a day.
- To guarantee high availability of our web application, we run multiple copies of our web application. Each replica is isolated from each other, including memory. Therefore each logo needs to be processed on every replica until it gets fully cached across all instances.
And this was just the tip of the iceberg. Let’s review all pros and cons in detail:
Pros
- The developer doesn’t need to pass the logo through a helper function, it’s just a simple HTTP request
https://company.com/logo-proxy?img=<url>. - Works under all conditions: As an
<img>-tag without additional markup or as a CSS background image. - Once a logo is processed, we keep it in memory.
- No additional compute on the client.
Cons
- Changes made to the logo manipulation require a redeploy of the entire web server, which is mission-critical as it renders our web application.
- Many requests on this endpoint could have side effects on the overall performance of the entire app.
- Slightly higher server costs.
- Our overall memory consumption increased (not much, but still a valid concern).
- A long persistent cache is not a given out of the box. This can be solved but, it adds additional complexity.
Fortunately, we noticed all those concerns quite early in the process so this version never made it to production. However, the discussion on how to solve this best was lively.
Solution III: Build a microservice
To solve the major drawback of the previous solution (coupling with the web-server), building a microservice sounds compelling. Apart from the general pros and cons of a microservice architecture, I want to highlight a few key points that stood out for us:
Pros
- Service can be deployed independent
- Does not affect our mission-critical web-server
Cons
- Another service to maintain
- Requires a separate project setup: CI/CD, monitoring, etc
Due to the additional setup complexity and maintenance required, we didn't actually implement this.
Revisit the problem
Let’s go back and revisit the problem again: All we want is to tint the background of the logo if it is whitish. We don’t want to maintain another service. Furthermore, we don’t want to add the mental overhead of setting up yet another service.
Solution IV: Cloud-native
The cloud promises to take away the burden of provisioning or managing servers so you can focus on what matters to you: your business logic. In our case, we want to tint the background. Knowing what the cloud has to offer is an integral part of this solution. The key to our solution is AWS Lambda@Edge. It doesn’t matter which cloud provider you’re using, most of them have similar products, but we use AWS and their two core products:
- CloudFront (CDN)
- AWS Lambda (Serverless function)
What is a CDN?
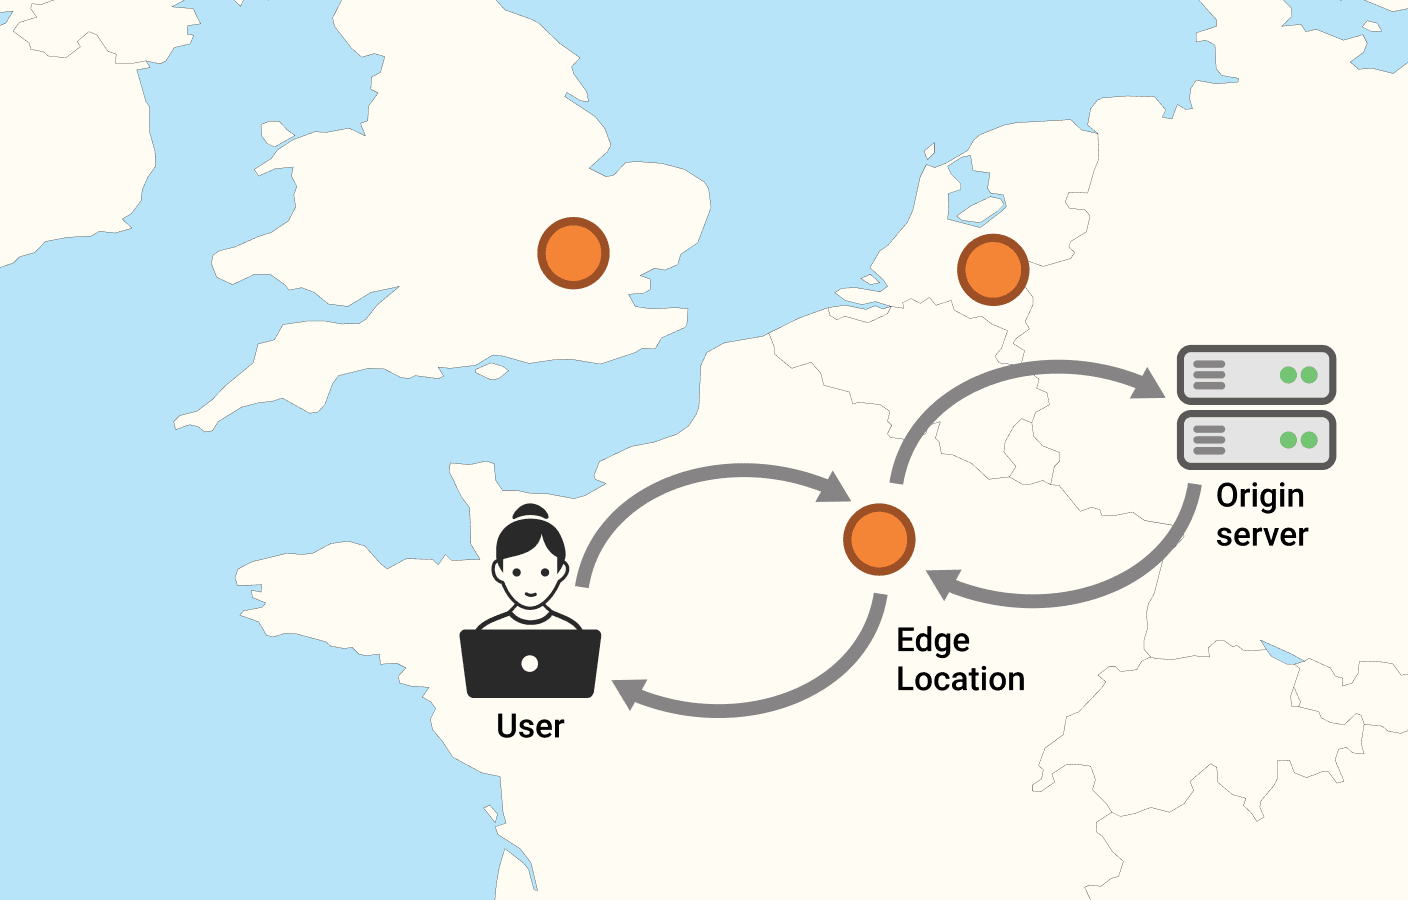
A CDN (content delivery network) is, simply speaking, a reverse proxy with caching, distributed around the world. When a user requests an object from the CDN, e.g. an image, the request is redirected to the nearest CDN server. This server might not have the requested image in the cache so it needs to fetch the original resource from an “origin” server. For a static object like an image, this is most likely an S3 bucket, but it can also be an EC2 instance, a Lambda function, or any server which can receive HTTP requests. However, if another user from the same region is requesting the same image again, this user will get the cached version from the regional edge cache.

It’s worth mentioning that CloudFront is not a global cache. Instead, each Edge location maintains its own cache.
What is a serverless function?
Compared to traditional server applications where you upload your code to servers, AWS Lambda is serverless. This means you don’t have to deal with provisioning or managing servers. All you care about is your business logic. This is also purportedly much cheaper, because no server needs to run 24/7 and wait for requests. Your code runs in response to an event in a super lightweight VM. Think about a serverless function like a request handler, but without the surrounding glue code for routing, monitoring, etc. It’s just your pure business logic.
Lambda@Edge: The key to this solution
Let’s have a closer look at a really neat CloudFront feature: It’s called Lambda@Edge and allows us to hook into the lifecycle of a CDN request. Those Lambda functions are executed closer to your end users at one of the 205 AWS edge locations (as of June 2020). This gives us the ability to modify the request and response, such as images. There are four different events that we can hook into:
- Viewer Request: When receiving a request from a viewer, but before CloudFront checks whether the requested object is in the edge cache.
- Origin Request: Before CloudFront forwards the request to the origin.
- Origin Response: After CloudFront receives the response from the origin, but before the object is stored in the edge cache.
- Viewer Response: Before the response is sent to the viewer, regardless of whether the object is coming from the edge cache or straight from the origin server.

Our solution
Now that we have a common understanding of what the cloud offers, implementing our solution is just a matter of the following steps:
- Set up a CDN (CloudFront distribution).
- Define the origin-server. In our case the third-party provider that returns the brand logos.
- Write the Lambda@Edge function which is able to manipulate a logo according to our needs.
- Run the Lambda function in response to the
origin responseevent. - Update our front-end code so that it pulls logos from our CDN instead of the third-party provider.

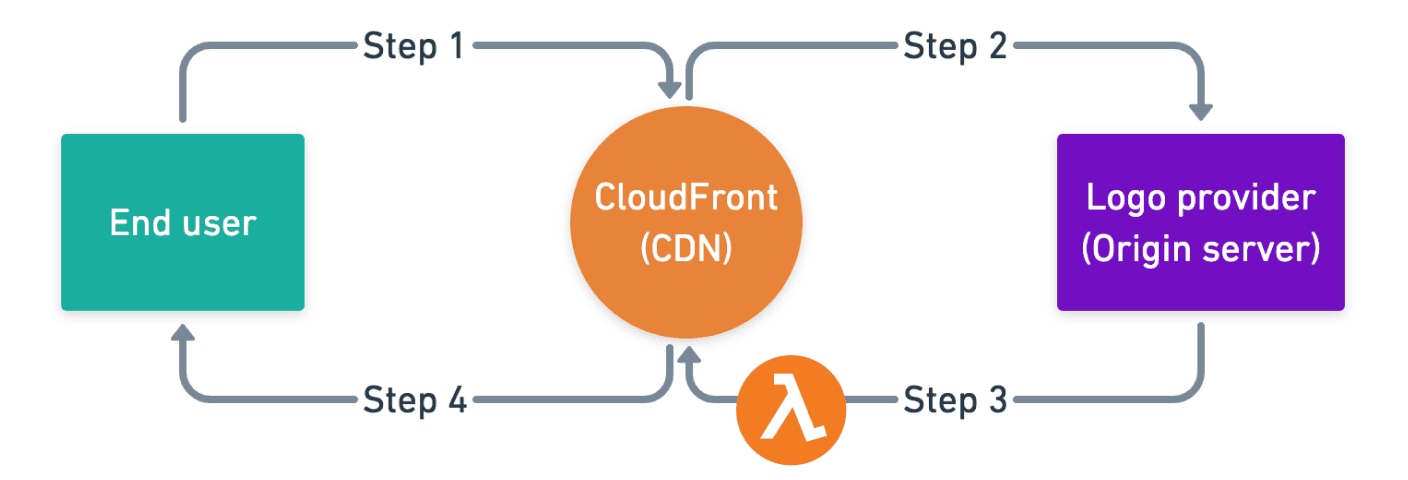
Here’s a step by step walkthrough of how it works
- Step 1: User requests a logo. CloudFront checks if the requested logo is already present in the edge cache. If so it returns the logo to the user via step 4
- Step 2: CloudFront fetches the logo from the origin-server
- Step 3: On the
Origin Responseevent run the Lambda@Edge function to manipulate the logo. This happens before the logo gets added to the cache. - Step 4: Logo from the edge cache is returned to the user.
Note: In step 3, all logos are added to the edge cache, regardless of whether the logo got tinted or not.
It’s worth pointing out that CloudFront doesn't cache objects forever. AWS isn’t explicit about their expiry dates, but according to a few tests, it looks like regular objects stay for about a day in the cache. Frequently requested objects may end up in the regional super cache with a longer cache duration, but again nothing you can and should count on.
However, computing every single logo once a day per region doesn’t hurt much. The function executes very fast and doesn’t need much memory so it’s cheap to run. We were considering uploading all processed logos to S3 to avoid unnecessary processing, but again the current architecture is so cheap it doesn’t outweigh the development cost. Implementing this would be quite simple.
Besides the general pros and cons of a serverless architecture, I want to highlight a few key aspects:
Pros
- Less code!
- Logos are served from a location close to the user
- The CDN edge cache does the job to act as a cache closer to the user
- We benefit from potential provider improvements without further work such as more CDN locations, faster lambda runs etc
Cons
- It’s some kind of microservice hidden in AWS
This blog post focuses on the high-level concept of our architecture. If you’re curious how to set up such a service architecture, check out the AWS blog where they explain in-depth how to set up your own resize image service with Lamdba@Edge.
Conclusion
The cloud is more than just a place to host your app. It’s a toolbox, filled with all kinds of handy tools, ready to help. Leveraging the cloud lets you focus on what’s matters to you, your business logic, and little to no maintenance is required: the possibilities of the cloud are endless, your time is not.